使用预先训练的网络进行分类
# import Keras & Tensorflow
import tensorflow as tf
import keras

# Load pre-trained Resnet50
# 加载预训练的ResNet50模型
model = keras.applications.resnet50.ResNet50(weights="imagenet")

# Connect with Google Drive
# 连接到谷歌云硬盘
from google.colab import drive
#drive.mount('/content/gdrive')

# Load in image and perform classification
# 加载图像并进行分类
import keras.utils as image
# import keras.preprocessing.image as image # earlier version of Tensorflow uses this
# 加载图像工具
img = image.load_img("/content/gdrive/My Drive/elephant.jpg", target_size=(224, 224)) # the image is in the root of Google Drive
# 加载图像,设置目标大小为224x224像素
# 将图像像素转换为numpy数组
img = image.img_to_array(img)
# 为模型调整数据形状
img = img.reshape((1, img.shape[0], img.shape[1], img.shape[2]))
# 为模型准备图像
img = keras.applications.resnet50.preprocess_input(img)
# 使用模型进行预测
Y_prob = model.predict(img)

# Show top K prediction
# 显示前K个预测结果
top_K = keras.applications.resnet50.decode_predictions(Y_prob, top=3)
for class_id, name, y_proba in top_K[0]:
  print("class_id:", class_id, "name:", name, " ", y_proba*100, "%")

图像数据img是一个三维数组,其形状为(height, width, channels),其中height是图像的高度,width是图像的宽度,channels是图像的通道数(比如RGB图像的通道数为3)。
深度学习模型通常期望输入是一个四维数组,其形状为(batch_size, height, width, channels)。其中batch_size是每批次输入的样本数量。因此,这行代码的目的是将单个图像数据调整为一个批次大小为1的批次,即在图像数据的最前面添加了一个维度为1的维度,形状变为(1, height, width, channels)。这样做的目的是确保输入数据与模型的输入要求相匹配,使其能够顺利地通过模型进行处理和预测。
微调预训练模型
# We use Tensorflow provided tf_flowers dataset
# 我们使用 TensorFlow 提供的 tf_flowers 数据集
# https://www.tensorflow.org/tutorials/load_data/images

# 导入 TensorFlow Datasets 库
import tensorflow_datasets as tfds

# 加载 tf_flowers 数据集,并返回数据集和信息
dataset, info = tfds.load("tf_flowers", as_supervised=True, with_info=True)

# 获取训练集的大小
dataset_size = info.splits["train"].num_examples
print("size: ", dataset_size)

# 获取数据集中类别的名称
class_names = info.features["label"].names
print("classes: ", class_names)

# 获取数据集中类别的数量
n_classes = info.features["label"].num_classes
print("num. classes: ", n_classes)

导入了 TensorFlow Datasets 库,然后使用 tfds.load 函数加载了 tf_flowers 数据集,并将其作为一个监督式学习问题加载(as_supervised=True)。加载数据集时,设置 with_info=True 参数可以同时返回数据集的信息。
将数据分为训练、测试和验证
这段代码将数据集分割为训练集、测试集和验证集,并设置了as_supervised=True以包含真实标签。以下是代码的注释解释:
# Split data into training, test and validation
# 将数据集分割为训练集、测试集和验证集
# Setting as_supervised to True to include ground truth labels
# 设置 as_supervised=True 以包含真实标签

# 加载数据集,并从训练集中划分出10%作为测试集
test_set = tfds.load("tf_flowers", split="train[:10%]", as_supervised=True)

# 加载数据集,并从训练集中划分出10%-25%作为验证集
valid_set = tfds.load("tf_flowers", split="train[10%:25%]", as_supervised=True)

# 加载数据集,并从训练集中划分出25%之后的数据作为训练集
train_set = tfds.load("tf_flowers", split="train[25%:]", as_supervised=True)使用了tfds.load函数,根据指定的分割规则将数据集分割成训练集、测试集和验证集。在这个过程中,设置了as_supervised=True,以便返回每个样本的输入特征和对应的真实标签。
数据预处理
# Data preprocessing
# 定义数据预处理函数,对图像进行调整大小并使用 Xception 模型的预处理函数进行预处理
def preprocess(image, label):
  # 调整图像大小为 224x224 像素
  resized_image = tf.image.resize(image, [224, 224])
  # 使用 Xception 模型的预处理函数进行预处理
  final_image = keras.applications.xception.preprocess_input(resized_image)
  return final_image, label

# 设置批处理大小
batch_size = 32

# 对训练集进行随机重排
train_set = train_set.shuffle(1000)

# 对训练集进行预处理:调用 preprocess 函数,重复数据集,批处理,并预取下一批数据以加快训练速度
train_set = train_set.map(preprocess).repeat().batch(batch_size).prefetch(1)

# 对验证集进行预处理:调用 preprocess 函数,重复数据集,批处理,并预取下一批数据以加快训练速度
valid_set = valid_set.map(preprocess).repeat().batch(batch_size).prefetch(1)

# 对测试集进行预处理:调用 preprocess 函数,批处理,并预取下一批数据以加快训练速度
test_set = test_set.map(preprocess).batch(batch_size).prefetch(1)
对 Xception 模型进行微调
# Fine-tuning xception model
# 加载预训练的 Xception 模型,不包括顶部的全连接层
base_model = keras.applications.xception.Xception(weights="imagenet", include_top=False)

# 添加全局平均池化层,用于减少特征图的维度
avg = keras.layers.GlobalAveragePooling2D()(base_model.output)

# 添加一个全连接层,输出类别数(n_classes)的概率分布
output = keras.layers.Dense(n_classes, activation="softmax")(avg)

# 构建最终的模型,输入为 Xception 模型的输入,输出为全连接层的输出
model = keras.Model(inputs=base_model.input, outputs=output)

# 打印模型的概要信息
model.summary()
keras.applications.xception.Xception 函数用于构建 Xception 模型,并且支持一系列参数来自定义模型的构建。以下是该函数的一些常用参数:
weights: 指定模型初始化的权重,默认为 'imagenet',表示使用在 ImageNet 数据集上预训练的权重。如果设置为 None,则模型会随机初始化权重。include_top: 是否包括顶部的全连接层,默认为 True。如果设置为 False,则不包括顶部的全连接层,即只包括卷积层部分。input_shape: 输入图像的形状,例如(224, 224, 3)表示输入图像的大小为 224x224 像素,并且有 3 个通道(RGB)。默认为(299, 299, 3),与 Xception 模型的默认输入大小相匹配。classes: 分类任务的类别数量,默认为 1000。仅当include_top=True且weights不为 None 时有效。classifier_activation: 分类器层的激活函数,默认为 'softmax'。仅当include_top=True时有效。
参考链接
固定的现有层进行训练
训练过程中固定模型的现有层(即不更新它们的权重),并使用学习率衰减的优化器进行训练
# Training with existing layers fixed
# 使用固定的现有层进行训练

# 定义学习率衰减函数
lr_schedule = keras.optimizers.schedules.ExponentialDecay(
    initial_learning_rate=0.02,  # 初始学习率
    decay_steps=10000,            # 学习率衰减步数
    decay_rate=0.9                # 学习率衰减率
)

# 将基础模型(Xception)的所有层设为不可训练
for layer in base_model.layers:
  layer.trainable = False

# 定义优化器,使用随时间指数衰减的学习率
optimizer = keras.optimizers.SGD(learning_rate=lr_schedule, momentum=0.9)

# 编译模型,指定损失函数、优化器和评估指标
model.compile(loss="sparse_categorical_crossentropy", optimizer=optimizer, metrics=["accuracy"])

# 训练模型,设置训练迭代次数、训练数据集大小和验证数据集大小
history = model.fit(train_set, epochs=5, steps_per_epoch=dataset_size*0.75//batch_size, validation_data=valid_set, validation_steps=dataset_size*0.15//batch_size)
定义了一个指数衰减的学习率调度器,然后将基础模型(Xception)的所有层设为不可训练,这样它们的权重在训练过程中将不会更新。接着,使用随时间指数衰减的学习率定义了一个优化器,并编译了模型,指定了损失函数、优化器和评估指标。最后,调用 model.fit 方法进行模型的训练,设置了训练迭代次数、训练数据集大小和验证数据集大小。
解冻模型的基础层,并继续训练模型
# The model can be further trained with base layers unfrozen
# 可以解冻模型的基础层,并继续训练模型

# 将基础模型(Xception)的所有层设为可训练
for layer in base_model.layers:
  layer.trainable = True

# 定义优化器,使用随时间指数衰减的学习率
optimizer = keras.optimizers.SGD(learning_rate=lr_schedule, momentum=0.9)

# 编译模型,指定损失函数、优化器和评估指标
model.compile(loss="sparse_categorical_crossentropy", optimizer=optimizer, metrics=["accuracy"])

# 继续训练模型,设置训练迭代次数、训练数据集大小和验证数据集大小
history = model.fit(train_set, epochs=5, steps_per_epoch=dataset_size*0.75//batch_size, validation_data=valid_set, validation_steps=dataset_size*0.15//batch_size)
我们将基础模型(Xception)的所有层设为可训练,这样它们的权重在训练过程中将会更新。然后,定义了一个优化器,使用了之前定义的学习率调度器。接着,编译了模型,指定了损失函数、优化器和评估指标。最后,调用 model.fit 方法继续训练模型,设置了训练迭代次数、训练数据集大小和验证数据集大小。
通过解冻基础层并继续训练模型,我们可以进一步微调模型,以适应新的数据集和任务,并提高模型的性能。这种逐步解冻层并进行微调的策略可以帮助我们在训练过程中更好地平衡模型的泛化能力和训练速度。
自编码器示例
这段代码是一个使用 Fashion MNIST 数据集的自编码器(Autoencoder)示例。以下是代码的注释解释:
# Autoencoder example using fashion MNIST
# 使用 Fashion MNIST 数据集的自编码器示例
# Load image data
# 加载图像数据
fashion_mnist = keras.datasets.fashion_mnist
(x_train, y_train), (x_test, y_test) = fashion_mnist.load_data()

# Define class names for fashion MNIST dataset
# 定义 Fashion MNIST 数据集的类别名称
class_names = ["T-shirt/top", "Trouser", "Pullover", "Dress", "Coat", "Sandal", "Shirt", "Sneaker", "Bag", "Ankle boot"]

# Data preparation:
# 数据准备:
# Map intensities from [0--255] to 0.0--1.0
# 将图像像素的强度从 [0--255] 映射到 0.0--1.0
x_train = x_train / 255.0
x_test = x_test / 255.0

# Define the encoder model
# 定义编码器模型
encoder = keras.models.Sequential([
    keras.layers.Flatten(input_shape=[28, 28]),
    keras.layers.Dense(100, activation="selu"),
    keras.layers.Dense(30, activation="selu")
])

# Define the decoder model
# 定义解码器模型
decoder = keras.models.Sequential([
    keras.layers.Dense(100, activation="selu", input_shape=[30]),
    keras.layers.Dense(28*28, activation="sigmoid"),
    keras.layers.Reshape([28, 28])
])

# Combine encoder and decoder to form autoencoder model
# 组合编码器和解码器,构建自编码器模型
ae = keras.models.Sequential([encoder, decoder])

# Compile the autoencoder model
# 编译自编码器模型
ae.compile(loss="binary_crossentropy", optimizer=keras.optimizers.SGD(learning_rate=1.5))

# Train the autoencoder model
# 训练自编码器模型
history = ae.fit(x_train, x_train, epochs=10, validation_split=0.1)
首先加载了 Fashion MNIST 数据集,并进行了简单的数据准备,将图像像素的强度从整数范围 [0, 255] 映射到浮点数范围 [0.0, 1.0]。然后,定义了编码器模型和解码器模型,分别用于将输入图像编码为潜在空间的表示和将潜在空间的表示解码为重建的图像。接着,将编码器和解码器组合在一起,构建了自编码器模型。最后,编译了自编码器模型,并使用训练数据集训练了自编码器模型。
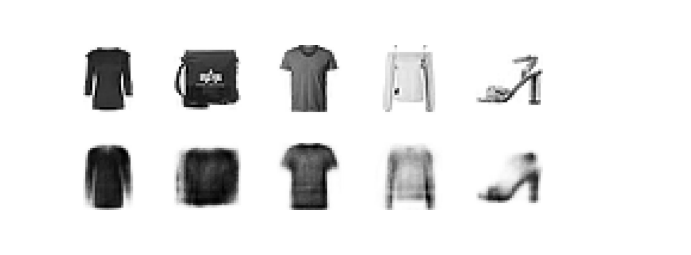
Visualise results
# Visualise results
# 导入 matplotlib 库用于绘图
import matplotlib.pyplot as plt

# 定义函数用于绘制图像
def plot_image(image):
  plt.imshow(image, cmap="binary")  # 绘制图像
  plt.axis("off")  # 不显示坐标轴

# 设置要可视化的图像数量
n_images = 5

# 使用自编码器模型对测试集图像进行重建
reconstructions = ae.predict(x_test[:n_images])

# 创建图像
fig=plt.figure(figsize=(n_images*1.5, 3))

# 循环绘制原始图像和重建图像
for idx in range(n_images):
  plt.subplot(2, n_images, 1+idx)
  plot_image(x_test[idx])  # 绘制原始图像
  plt.subplot(2, n_images, 1+n_images+idx)
  plot_image(reconstructions[idx])  # 绘制重建图像
导入 matplotlib 库,然后定义了一个函数 plot_image(image) 用于绘制图像。接着,选择了要可视化的图像数量,并使用自编码器模型对这些图像进行重建。最后,创建了一个图像,循环绘制了原始图像和重建图像,并展示出来。